
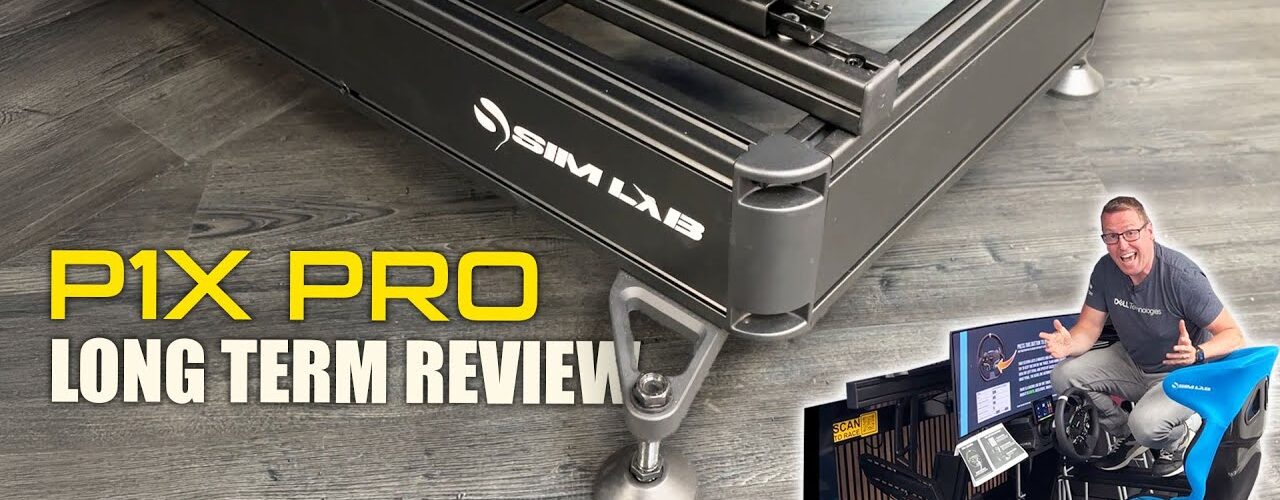
The best way to test a sim racing cockpit isn’t to build it, sit in it carefully for a week and then tell you how rigid it feels. It’s to put it somewhere hundreds of different people can use it, let them climb in and out every day for months, and see what eventually works loose. That’s effectively what happened with our Sim-Lab P1X Pro.
This rig lives in our office and is used for a hot-lap leaderboard. People scan in, drive their session and move on. Over the first couple of months there may have been as many as 300 different people sitting in it, with some people using it daily. I use it almost every day myself. Despite all of that, I haven’t had to adjust or retighten a single bolt.
| Logo | Brands | Reseller | Discount Code | Link | Ships to | Locations |
|---|---|---|---|---|---|---|
 | Fanatec | Fanatec USA | https://laurencedusoswa.com/a/FANATEC-USA | America | Beverly Hills, California, USA | |
| Fanatec | Fanatec EU | https://laurencedusoswa.com/a/FANATEC-EU | EU | Landshut, Germany | |
| Fanatec | Fanatec Australia | https://laurencedusoswa.com/a/FANATEC-OZ | Australia | New South Wales, Australia | |
| Fanatec | Fanatec Japan | https://laurencedusoswa.com/a/FANATEC-JP | Japan | Tokyo, Japan | |
 | BDH, Conspit, Cube Controls, D-BOX, Heusinkveld, Logitech, MOZA, Pimax, Qubic System, Rexing, Simagic, Simucube, Trak Racer, VNM | Trak Racer USA | https://laurencedusoswa.com/a/TRAK-RACER-USA | America | Austin, Texas, USA | |
| BDH, Conspit, Cube Controls, D-BOX, Heusinkveld, Pimax, Qubic System, Rexing, Simagic, Simucube, Trak Racer, VNM | Trak Racer UK | https://laurencedusoswa.com/a/TRAK-RACER-UK | UK | Hertfordshire, England, UK | |
| BDH, Conspit, Cube Controls, D-BOX, Heusinkveld, MOZA, Pimax, Qubic System, Rexing, Simagic, Simucube, Trak Racer, VNM | Trak Racer EU | https://laurencedusoswa.com/a/TRAK-RACER-EU | EU | Venlo, The Netherlands | |
| BDH, BWT Alpine Formula One Team, Conspit, Cube Controls, D-BOX, Heusinkveld, Hot Wheels, Pimax, Qubic System, Rexing, Simagic, Simucube, Trak Racer, VNM | Trak Racer Australia | https://laurencedusoswa.com/a/TRAK-RACER-OZ | Australia | Victoria, Australia | |
 | Asetek | Asetek Global | 5% off with coupon code 'LD' | https://laurencedusoswa.com/a/ASETEK-GLOBAL | Global | Florida, USA. Aalborg, Denmark |
| Asetek | Asetek USA | 5% off with coupon code 'LD' | https://laurencedusoswa.com/a/ASETEK-USA | America | Florida, USA |
| Asetek | Asetek EU | 5% off with coupon code 'LD' | https://laurencedusoswa.com/a/ASETEK-EU | EU | Aalborg, Denmark |
 | Simagic | Simagic Direct | 3% off with coupon code 'LD' | https://laurencedusoswa.com/a/SIMAGIC | Global | Shenzhen, China, Asia |
 | Fanatec, GT Omega, HORI, Logitech G, MOZA Racing, Next Level Racing, Playseat, PXN, Thrustmaster, DIWANGUS | Amazon Global (will bring you to your local amazon store automatically) | https://laurencedusoswa.com/a/AMAZON | Global | ||
 | Apex Sim Racing, Cube Controls, D-BOX, Elgato, MOZA Racing, Pimax, Sabelt Sim Racing, Simagic, Simnet Racing, Simucube | Apex Sim Racing | 5% off with coupon code 'LD' | https://laurencedusoswa.com/a/APEX-SIM-RACING | Global | New Jersey, USA |
 | Advanced SimRacing, Ascher Racing, Base Performance Simulators, BavarianSimTec, BDH Race Sim Hardware, ButtKicker, Cube Controls, Daniel Newman Racing, D-BOX Technologies, Delta Sim-Tech, Gomez Sim Industries, Heusinkveld, IgnitiON Controls, Logitech, Max Papis Innovations, MME Motorsport, MOZA Racing, Novus Racing Simulators, P1Sim, Playseat, Precision Sim Engineering, Qubic System, Simucube, Sparco, Thrustmaster, Vero Motion, VNM Simulation, VPG Sim | Advanced Sim Racing | 5% off with code LDUSOSWAFIVE | https://laurencedusoswa.com/a/ASR | Global | Montreal, Canada |
 | Ascher Racing, ASUS, Base Performance Simulators, BDH Race Sim Hardware, ButtKicker, Cobra, Cube Controls, EPOS, Fanatec, Gigabyte, Go-Race, Gomez Sim Industries (GSI), Heusinkveld Engineering, ImSim, MME SimSport, MOZA, OBP, O-Rouge, Overclockers, Qubic System, Racelogic, Rexing, Sabelt Sim Racing, Samsung, Simucube, Simtag, Simtrecs, Sparco, Trak Racer, VPG Sim | Demon Tweeks | https://laurencedusoswa.com/a/DEMON-TWEEKS | Global | Wrexham, Wales, UK | |
 | bruzzi, ButtKicker, Conspit, Marina Racewear, MOZA Flight, MOZA Racing, Next Level Racing, Pro Simrig, Qubic System, Racing Sims, Sim Did, Simagic, Simetik, Simforge, Soelpec, Vero Motion | Abruzzi | https://laurencedusoswa.com/a/ABRUZZI | UK, EU | East-Sussex, England, UK | |
 | Streamlabs | Streamlabs | https://laurencedusoswa.com/a/STREAMLABS | Global | ||
| Restream | Restream | https://laurencedusoswa.com/a/RESTREAM | Global | |||
 | iRacing | iRacing | https://laurencedusoswa.com/a/IRACING | Global | Chelmsford, Massachusetts, USA | |
 | Coach Dave Delta | Coach Dave Academy | https://laurencedusoswa.com/a/CDA | Global | London, England, UK | |
 | Soelpec | Soelpec | https://laurencedusoswa.com/a/SOELPEC | Global | Istanbul, Turkey | |
 | Moza | Moza UK | https://laurencedusoswa.com/a/MOZA-UK | United Kingdom | UK | |
| Moza | Moza US | https://laurencedusoswa.com/a/MOZA-US | North & South America | USA | |
| Moza | Moza EU | https://laurencedusoswa.com/a/MOZA-EU | Global | Europe | |
| Moza | Moza Direct | https://laurencedusoswa.com/a/MOZA | Global | Shenzhen, China, Asia | |
 | Cobra, PRO SIMRIG, Qubic System, SIMAGIC, Sparco | RaceAnywhere | https://laurencedusoswa.com/a/RACE-ANYWHERE | UK, EU | Northamptonshire, UK | |
 | Grid Engineering, Sim-Lab, Sparco | Sim-Lab Direct | https://laurencedusoswa.com/a/SIM-LAB | Global | Tholen, The Netherlands, EU | |
 | Cammus | Cammus Direct | 5% off with code LDCAMMUS | https://laurencedusoswa.com/a/CAMMUS | Global | China, Asia |
 | Buttkicker | Buttkicker Direct | https://laurencedusoswa.com/a/BUTTKICKER | Global | Ohio, USA | |
 | Apex Sim Racing, Asetek SimSports, Gomez Sim Industries, Next Level Racing, SimSportGadget, Simtrecs, Simucube | SimRaceCity | 5% off with promocode: potato-nation | https://laurencedusoswa.com/a/SRC | USA | Fort Worth, Texas, USA |
 | Extreme Simracing, Simagic, D-BOX, DBOX | Extreme Simracing | https://laurencedusoswa.com/a/EXTREME-SIMRACING | America | Maringá, Paraná, Brazil | |
 | Ascher Racing, BavarianSimTec, SimRacingBay, Simucube | SimRacingBay | https://laurencedusoswa.com/a/SIMRACINGBAY | Global | Slovenia, EU | |
 | Simforge Engineering | Simforge Engineering | https://laurencedusoswa.com/a/SIMFORGE | Global | Chennai, India, ASIA | |
 | Website Hosting | HostGator | https://laurencedusoswa.com/a/HOST-GATOR | Global | USA | |
| RacGTing Racing Cockpits | RacGTing | https://laurencedusoswa.com/a/RACGTING | Global | Asia | ||
 | Getail Design | Getail Design | 5% off with coupon code 'LD' | https://laurencedusoswa.com/a/GETAIL | Global | Bergamo, Italy, EU |
 | Pimax | Pimax EU | https://laurencedusoswa.com/a/PIMAX-EU | EU | EU | |
| Pimax | Pimax | https://LaurenceDusoswa.com/a/PIMAX | Global | Shanghai , China | |
 | Asetek, Cube Controls, Fanatec, Sim Lab, Simagic | IRL Motorsports | https://laurencedusoswa.com/a/IRL-MOTORSPORTS | EU, UK | Dublin, Ireland | |
 | BDH | BDH Sim Hardware | https://laurencedusoswa.com/a/BDH | Global | Pocklington, York, UK | |
 | BDH, CAMMUS, Conspit, DOF Reality, Fanatec, Heusinkveld, MOZA Racing, PXN, Qubic System, Race Sim, Simnet Racing | RACESIM UK | 5% off with coupon code 'LD' | https://laurencedusoswa.com/a/RACESIMUK | UK, EU | London, UK |
 | Asetek SimSports, Conspit, Corbeau, Cube Controls, DOF Reality, Fanatec, Gomez Sim Industries (GSI), Heusinkveld, Leoxz, Moza, Sabelt, SIM HQ, Sim-Lab, Simagic, SRP, VRS | Simpatico Sim Shop | 5% off with coupon code 'POTATONATION' | https://laurencedusoswa.com/a/SIMPATICO | USA, Canada | Jacksonville FL, USA |
 | Conspit | iracesimulators | 10% off with code 'LD' | https://laurencedusoswa.com/a/IRACESIMULATORS | EU | Dublin, Ireland |
 | Bavarian Sim Tec | Bavarian Sim Tec | 5% off with coupon code LAURENCE-DUSOSWA | https://laurencedusoswa.com/a/BST | GLOBAL | Bavaria, Germany |
 | Advanced Sim Racing, Ascher Racing, D-Box Technologies, HandsOnPerformance, Heusinkveld, Moza, Novus, OMP, ProSimRig, Simagic, Sim Consultants, Simucube, Sparco, Vero Motion | Sim Consultants | 5% off Simagic with code 'LD' | https://laurencedusoswa.com/a/SIM-CONSULTANTS | EU, UK | Dublin, Ireland, EU |
 | Asetek SimSports, Conspit, Cooler Master, Cube Controls, Fanatec, Logitech, MOZA Racing, Next Level Racing, Nitro Concepts, noblechairs, Simucube, Thermaltake, Thrustmaster | Overclockers (UK & USA) | https://laurencedusoswa.com/A/OVERCLOCKERS | Global | UK, USA | |
 | Advanced Sim Racing, Ascher Racing, BDH, Conspit, Full Push, Moza, Next Level Racing, Novus, Thrustmaster, VPG Sim | Full Push | 5% off with code 'LD' | https://laurencedusoswa.com/A/FULLPUSH | Canada | Canada |
 | Simsonn | Simsonn | 8% off with code LAURENCEDUSOSWA | https://laurencedusoswa.com/A/SIMSONN | Global | Kington, Herefordshire, United Kingdom & China |
 | 3DRap, Another Way, Ascher Racing, Asetek SimSports, Bavarian SimTec, BDH Race Sim, Brook Raslution, ButtKicker, Circuit One, Conspit, Cooler Master, Cube Controls, D-BOX, Dayton Audio, Delta Sim-Tech, DOF Reality, Elgato, EPLAB, Esportsim, Fanatec, FatBlackCat, GSI, Heusinkveld, HORI, KGL Creation Lab, Leoxz, MME Motorsport, MOZA FlightSim, MOZA Racing, MPI, Next Level Racing, Nitro Concepts, Novus, OMP, O-Rouge, OPLite, P1Sim, Pimax, Playseat, Pro Flight Trainer, Prosimu, PXN, Qubic System, Res-Tech, Rexing, Sabelt, Sensit Haptics, SG Racing, Sim Factory, Sim-Lab, Sim Racing Studio, Simagic, Simforge, Simgrade, SimRep, SimRig, Simucube, Simufy, Simsonn, Simtrecs, SimXPro, Soelpec, Sparco, The Mech Cat, Thermaltake, Thrustmaster FlightSim, Thrustmaster SimRacing, Tillett, TORQ, TrackTime, Trak Racer, VERO Motion, VIRPIL Controls, Virtual Fly, VNM Simulation, VPG Sim, VRS, Wheel Stand Pro | Simufy | https://laurencedusoswa.com/A/SIMUFY | EU, Global | Granada, Spain, EU | |
 | AccuForce, Asetek, CAMMUS, Conspit, Elgato (Stream Deck), Fanatec, Gomez Sim Industries, Logitech, Moza, PXN, Simagic, Simucube, Thrustmaster, VNM, VRS, Virpil | Sim Sport Gadget | 5% off with coupon code 'LAURENCE' | https://laurencedusoswa.com/A/SIMSPORTGADGET | USA, Global | Newark, NJ, USA |
| Asetek Racing | Asetek Nordic | 5% off with coupon code 'LD' | https://laurencedusoswa.com/A/ASETEK-NORDIC | ||
 | UGREEN | UGREEN | https://laurencedusoswa.com/A/UGREEN | Global | EU | |
 | Honeycomb | Honeycomb | 10% discount with code LAURENCEDUSOSWA10 | https://laurencedusoswa.com/a/HONEYCOMB | Global | EU, USA |
The biggest difference: it simply doesn’t move
The P1X Pro replaced another perfectly decent rig in the office, but that previous cockpit needed attention roughly once a week. I’d find myself checking or tightening bolts as repeated use gradually worked things loose. The P1X Pro has been completely different. Hundreds of users later, nothing has needed retightening.
That rigidity is noticeable even with relatively modest hardware. During this test we deliberately kept the same basic wheelbase and pedals from the previous rig so we could judge what the cockpit itself changed. The wheelbase is only around 5Nm and the brake isn’t even load-cell, yet the reduction in flex means more of the hardware’s input actually reaches the driver instead of disappearing into movement in the cockpit.
I’ve reviewed very different cockpit designs such as the Trak Racer TR8 Pro, but this is where a high-end aluminium-profile rig earns its reputation: once everything is assembled correctly, it feels enormously solid.
Surprisingly easy to build
I expected the P1X Pro installation to turn into an all-day project. Instead, some colleagues who had never built a rig like this before helped assemble the entire thing in roughly an hour and a half. It has been the easiest aluminium-profile cockpit we’ve put together.
A major reason is that Sim-Lab has removed much of the traditional bracket-and-T-slot-nut busywork. My older P1X used a large number of conventional 90-degree corner brackets, each requiring multiple bolts and T-slot nuts. The P1X Pro’s integrated corner solutions make the structure considerably cleaner and much faster to assemble. A number of mounting holes are pre-drilled too, reducing how much measuring and lining-up you need to do.
The finish on my example was also excellent. I didn’t find the chips or scratches I’ve sometimes seen on profile hardware in the past, and the powder coating has a slightly different, very nice texture. Small details such as the bolt covers help make the finished cockpit look much more deliberate than the industrial appearance people often associate with aluminium profile.
The new profile design looks cleaner, but has a trade-off
The P1X Pro doesn’t use traditional multi-channel profile everywhere. The side uprights have fewer exposed channels, which contributes to the much cleaner appearance. For this office installation, the available mounting positions have been more than enough.
There is a trade-off if you’re someone like me who constantly changes hardware. Traditional aluminium profile gives you almost absurd freedom to bolt accessories anywhere. The P1X Pro is still highly configurable, but it isn’t quite the same blank canvas. For a normal owner who builds the rig, finds the right position and leaves it there, I don’t think that’s much of a problem.
The uprights are also angled slightly towards the driver. That means moving hardware vertically can also move it slightly closer to or farther from you. Again, for a set-and-forget installation that’s barely worth worrying about. Reviewers and people constantly swapping wheelbases need to think about it a little more.
Wheelbase mounting and rigidity
We’re using the universal wheelbase mount, with pre-drilled mounting holes that suited the hardware installed during the test. I plan to use more wheelbases on this rig over time, but even with our relatively basic setup the mount has been exceptionally solid.
If you’re planning something less conventional such as a seat mover or other motion hardware, the pre-drilled nature of some components is worth checking before purchase. Make sure the mounting pattern and clearances work for what you’re trying to install rather than assuming you’ll simply be able to drill or slide everything anywhere.
Pedal deck and sliders
The pedal deck is one of my favourite parts of the P1X Pro. It’s large, extremely rigid and, in my opinion, nicer than the pedal deck on my previous P1X and many other rigs I’ve used. Even at fairly extreme adjustment positions we haven’t had meaningful rigidity problems.
For this installation we’ve added a pedal slider. Rather than continually changing the main pedal-deck position, the plate itself can move backwards and forwards. That movement also changes the effective height and angle relationship slightly: moving the pedals farther away takes you somewhat closer to a formula-style position.
We also fitted seat sliders. For an office rig this combination is almost essential. A short driver, tall driver, man or woman can jump in and get into a usable position within seconds. If multiple people use your simulator at home, I’d highly recommend them too. If you’re the only person who ever drives your rig, you may never touch them and the extra expense becomes harder to justify.
There is one engineering compromise: sliders introduce a tiny amount of additional flex. If your only objective is creating the most rigid cockpit physically possible, bolting everything directly in place will always win. In actual use here, though, the small compromise has been absolutely worth the convenience.
The integrated monitor mount is excellent
The monitor mounting system impressed me far more than I expected. On the previous setup the screen sat too high, which meant drivers were looking upwards slightly. The P1X Pro’s integrated mount lets us bring the display down close to the wheelbase and gives a much better field of view. You feel more like you’re sitting in the car rather than looking up at a television.
The mount is extremely rigid. You may be able to see a tiny amount of screen movement on a static camera, but sitting in the cockpit it isn’t remotely problematic. It has no more noticeable movement than you’d experience in plenty of real competition cars.
There’s enough width in the structure to support a future triple-screen installation, and the Vario-style adjustment system is a particularly useful detail. Fine adjustment bolts let you align individual monitors rather than repeatedly loosening everything and hoping the screens line up. That’s something I would have appreciated enormously on some of my older triple-screen setups.
For my own home rig, where I’m constantly changing hardware for reviews, I’d still lean towards a standalone triple-monitor stand. An integrated display moves with the cockpit and changing wheelbase positions can mean revisiting screen placement. For a more permanent setup, however, the integrated solution is excellent.
Seat quality – but choose the right size
The supplied fibreglass seat has been very good. There’s a small amount of natural movement if you deliberately push against the shell, but that’s normal for a lightweight fibreglass seat rather than flex in the cockpit itself.
Our mistake was choosing the regular size. We have some larger people using the office simulator and I should have specified the XL. If you’re even slightly concerned about fit, think carefully about seat sizing before ordering. Unlike moving a pedal slider, an uncomfortable seat isn’t something adjustment can solve.
Considering the abuse it has received, wear has been minimal. There are small areas showing friction, but that’s after potentially hundreds of people climbing in and out over only a couple of months. For me, that makes this office a much better durability test than carefully using the rig at home.
What would I change?
- I’d order the XL seat for a shared rig where drivers vary significantly in size.
- I’d probably put the cockpit on wheels if I expected to move it regularly.
- For a review rig, I’d use standalone triples because I’m constantly changing wheelbases and screen positions.
- I’d consider whether I really needed sliders on a single-user rig, although they’re invaluable for our office setup.
Long-term verdict
The most impressive thing about the Sim-Lab P1X Pro isn’t one bracket, one pedal plate or a headline specification. It’s that we’ve effectively tried to abuse it and it has simply carried on doing its job.
The entire cockpit was assembled in around 90 minutes by people who hadn’t built one before. Since then potentially hundreds of people have climbed into it, some have used it daily, I’ve used it almost every day myself, and people haven’t always treated it with the delicacy you’d expect from the owner of an expensive sim rig. I haven’t retightened a single bolt.
It’s significantly more rigid than the cockpit it replaced, beautifully finished, easier to assemble than traditional profile rigs I’ve used, and the pedal deck and monitor mounting are particularly impressive. The compromises – fewer profile channels, the movement created by the angled uprights and tiny amounts of flex from sliders – matter mainly to people who constantly modify their setup.
For somebody who wants to build a high-end cockpit, adjust it correctly and then drive it for years, the P1X Pro makes a huge amount of sense. Our office installation has been an unusually harsh real-world test, and it has passed it brilliantly.
Sim-Lab supplied the P1X Pro for this project. As always, these conclusions are based on my own experience using the hardware. I also use affiliate links and discount codes for sim-racing products; using them can save you money while helping support the channel.





Add comment